Om wat weerbaarder te zijn en meer handvatten te hebben zijn de volgende instellingen goed om te implementeren in de exchange omgeving.
External E-mail Tagging.
Zoals hier beschreven: https://office365itpros.com/2021/03/11/external-email-tagging-exo/
Connect-ExchangeOnlineSet-ExternalInOutlook –Enabled $true
Set-ExternalInOutlook -AllowList "domein1.nl", "domein2.nl", "domein3.nl" -Enabled $True
Get-ExternalInOutlookNaam controleren van externe partij tegen interne database.
Nadeel is dat je zelf de database moet bijvullen en aanpassen als er nieuwe gebruikers zijn of weg gaan.
Zoals beschreven: https://lazyadmin.nl/office-365/warn-users-for-email-impersonation-phishing-mail/
Get all existing users
$displayNames = (Get-EXOMailbox -ResultSize unlimited -RecipientTypeDetails usermailbox).displaynameSet the transport rule name
$transportRuleName = "Impersonation warning"Get existing transport rule
$existingTransportRule = Get-TransportRule | Where-Object {$_.Name -eq $transportRuleName}Create the Warning Banner
$HTMLDisclaimer = '<table border=0 cellspacing=0 cellpadding=0 align="left" width="100%">
  <tr>
    <td style="background:#ffb900;padding:5pt 2pt 5pt 2pt"></td>
    <td width="100%" cellpadding="7px 6px 7px 15px" style="background:#fff8e5;padding:5pt 4pt 5pt 12pt;word-wrap:break-word">
      <div style="color:#222222;">
        <span style="color:#222; font-weight:bold;">Warning:</span>
        This email was sent from outside the company and it has the same display name as someone inside our organisation. This is probably a phishing mail. Do not click on links or open attachments
        unless you are certain that this email is safe.
      </div>
    </td>
  </tr>
</table>
<br/>'
Create the Transport Rule with PowerShell
Write-Host "Creating Transport Rule" -ForegroundColor Cyan# Create new Transport Rule
New-TransportRule -Name $transportRuleName -FromScope NotInOrganization
-SentToScope InOrganization -HeaderMatchesMessageHeader From
-HeaderMatchesPatterns $displayNames -ApplyHtmlDisclaimerLocation Prepend
-ApplyHtmlDisclaimerText $HTMLDisclaimer `
-ApplyHtmlDisclaimerFallbackAction WrapWrite-Host "Transport rule created" -ForegroundColor GreenExternal Email working maar alleen bij sommige woorden.
Beschreven in de gedeelte https://lazyadmin.nl/it/add-external-email-warning-to-office-365-and-outlook/
Configure External Email Warning in Exchange Online
If you want to configure the external email warning for only a single-tenant, then it’s more convenient to use the Exchange Admin Center for this.
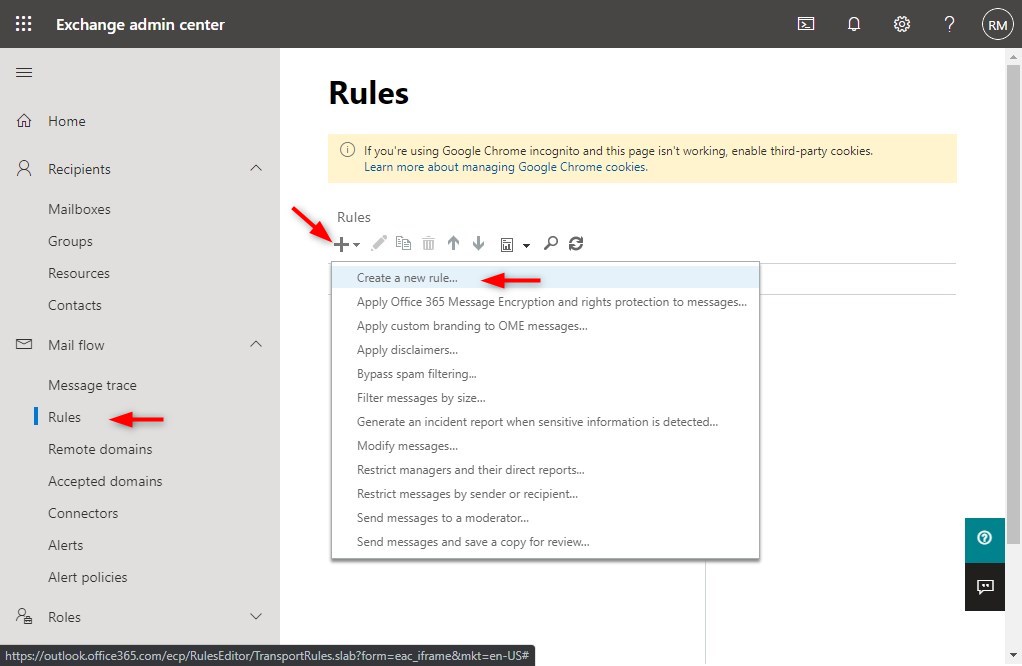
Step 1 – Create a new Mail Flow Rule in the Exchange Admin Center
– Login to the Exchange Admin Center
– Expand Mail flow
– Select Rules
– Click on the plus and select Create a new Rule
Step 2 – Give the rule a name
Enter a name for the rule so you can easily recognize it later, for example, “external email warning”
Step 3 – Configure Apply this rule if
We only want to apply the rule when the email comes from an external source. And we also want to add a filter to match the subject or body against a list of words.
- Click on Apply this rule if
- Choose The sender… is external/internal
- Select Outside the organization
We need to add extra conditions, to do this you will need to click on + Icon behind the rule.
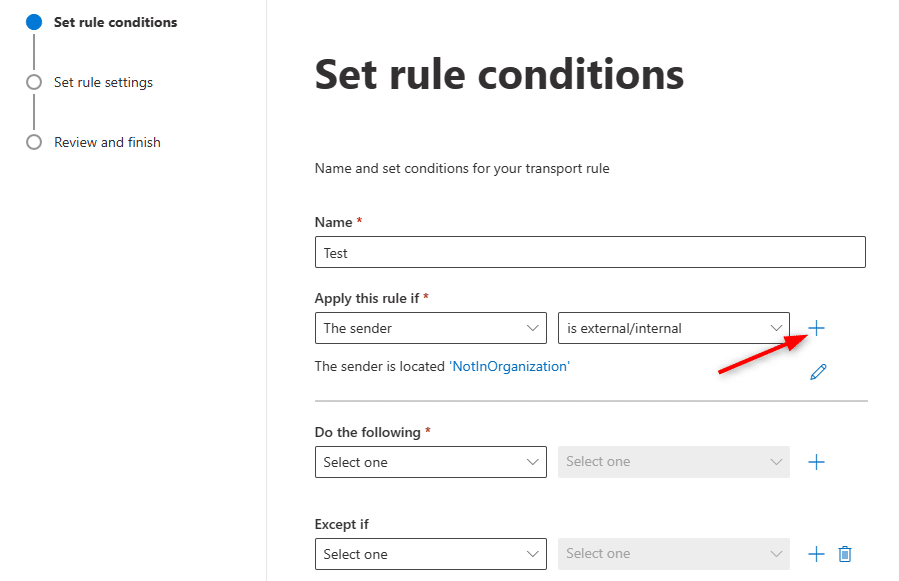
You can add as many rules as needed by using the + icon. In the new rule select the following options
- Choose The recipient is … external/internal
- Select Inside this organization
We are going to add one more condition so we only show the warning when the subject or body matches specific words or phrases:
- Click on Add Condition (plus icon) behind the Apply this rule if
- Choose The subject or body matches…
- Select Subject or body matches these text patterns
Now you can add all words and phrases manually or use PowerShell for this. Just add one or two phrases for now and we will update the list later with PowerShell.

The list below is based on the Regex list from SwiftOnSecurity that you can find here on GitHub.
Password.*[expire|reset]
check de lijst op github en check hoe je hem in een keer kan toevoegen onderaan deze pagina.
Step 4 – Adding the external email warning
With the conditions in place, is the next step to add the warning that we want to display. We are going to add the external email warning example below. But you can customize it to your needs of course.
At the end of the article, I have added a couple of other examples for the warning message.
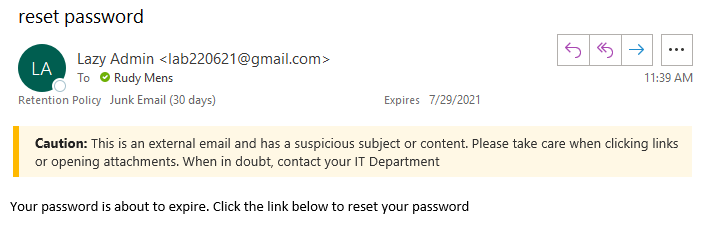
We can use some basic HTML to format the warning message:
<table border=0 cellspacing=0 cellpadding=0 align=”left” width=”100%”>
<tr>
<td style=”background:#ffb900;padding:5pt 2pt 5pt 2pt”></td>
<td width=”100%” cellpadding=”7px 6px 7px 15px” style=”background:#fff8e5;padding:5pt 4pt 5pt 12pt;word-wrap:break-word”>
<div style=”color:#222222;”>
<span style=”color:#222; font-weight:bold;”>Caution:</span>
This is an external email and has a suspicious subject or content. Please take care when clicking links or opening attachments. When in doubt, contact your IT Department
</div>
</td>
</tr>
</table>
<br />
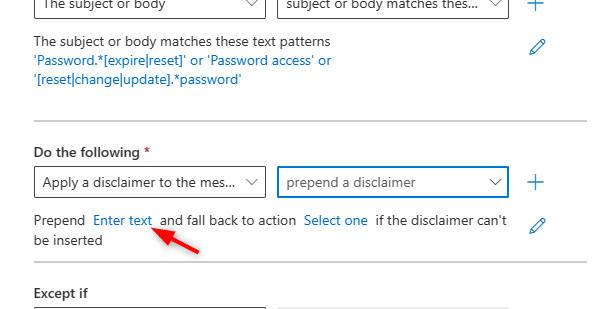
- Click on Do the following
- Choose Apply a disclaimer to the message
- Select Prepend the disclaimer…
- Click on Enter text…
- Paste the HTML code from above into the text box
- Click on Select one.. and set the fallback action to Wrap
Step 5 – Add Exceptions
You might want to add some exceptions to the rule. You may have for example an application that sends emails with a password reset link. We can add multiple exceptions under Except if.
The exception can be based on domains, specific senders, words, IP Addresses, etc. A good exception to add is to exclude the warning in meeting invites. For this, you can use the following rule:
- The message properties > Include the message type
- Set the message type to Calendaring
Step 6 – Save the rule
With the rule completed, you can save it to enable it. If you want to test the rule first you can change the Apply this rule if condition This Recipient is located to is this person and enter your own email address.
This way the rule will only be applied to your mailbox, allowing you to safely test it before rolling it out to the organization.
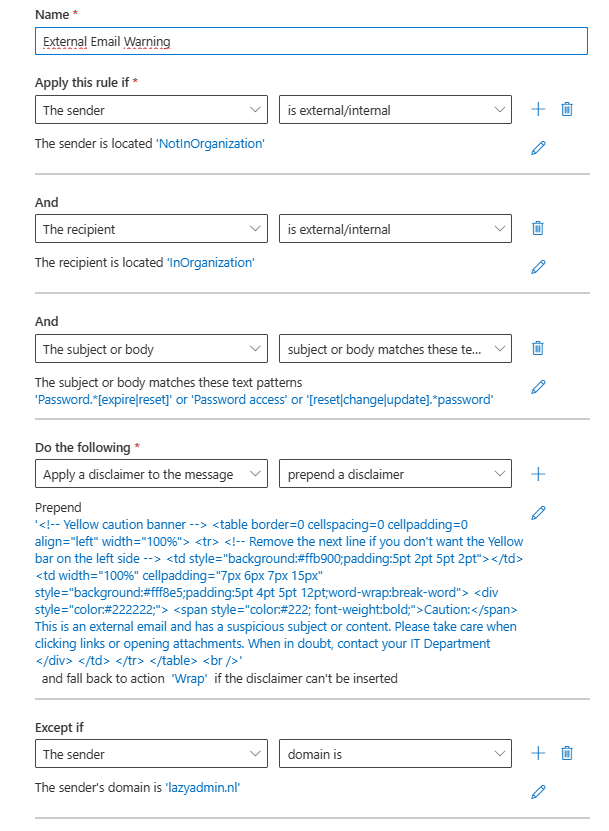
The complete rule should look similar to this:
Step 7 – Add all the words and phrases with PowerShell
The list of words and phrases is pretty long, so instead of adding them all manually, we are going to update the transport rule with PowerShell.
First, we need to get the transport rule based on its name. This is the same name we entered in step 2. If you are unsure, you can also list all the transport rules with Get-TransportRule
I always do a Get first to be sure that I have the correct rule before making any changes to the configuration of the rule.
# Connect to Exchange Online
# Enter your userprincipalname to use SSON
Connect-ExchangeOnline -userprincipalname john@contoso.com
# Get the transport rule
Get-TransportRule -Identity “External Email Warning” | select -ExpandProperty SubjectOrBodyMatchesPatterns
This should return the rule that we have just created with the words or phrases that you entered manually in Step 3.
I have saved the patterns in a text file in my temp folder. This way we can easily import it with PowerShell:
# Update the transport rule with all the patterns
Set-TransportRule -Identity “External Email Warning” -SubjectOrBodyMatchesPatterns (Get-Content C:\temp\patterns.txt)
# Check if the import was successful:
Get-TransportRule -Identity “External Email Warning” | select -ExpandProperty SubjectOrBodyMatchesPatterns
Using PowerShell to create the External Warning
If you want to add the external email warning to multiple tenants, then it’s easier to use PowerShell. The script below creates an Exchange Online transport rule with all the settings as described earlier.
Make sure you have the patterns.txt in the same folder as the script.
# Connect to Exchange Online
Write-Host “Connect to Exchange Online” -ForegroundColor Cyan
Connect-ExchangeOnline
$HTMLDisclaimer = ‘<table border=0 cellspacing=0 cellpadding=0 align=”left” width=”100%”>
<tr>
<td style=”background:#ffb900;padding:5pt 2pt 5pt 2pt”></td>
<td width=”100%” cellpadding=”7px 6px 7px 15px” style=”background:#fff8e5;padding:5pt 4pt 5pt 12pt;word-wrap:break-word”>
<div style=”color:#222222;”>
<span style=”color:#222; font-weight:bold;”>Caution:</span>
This is an external email and has a suspicious subject or content. Please take care when clicking links or opening attachments. When in doubt, contact your IT Department
</div>
</td>
</tr>
</table>
<br/>’
Write-Host “Creating Transport Rule” -ForegroundColor Cyan
# Create new Transport Rule
New-TransportRule -Name “External Email Warning” `
-FromScope NotInOrganization `
-SentToScope InOrganization `
-SubjectOrBodyMatchesPatterns (Get-Content $PSScriptRoot\PhishingPatterns.txt) `
-ApplyHtmlDisclaimerLocation Prepend `
-ApplyHtmlDisclaimerText $HTMLDisclaimer `
-ApplyHtmlDisclaimerFallbackAction Wrap
Write-Host “Transport rule created” -ForegroundColor Green
You can also find the complete script, external email warning HTML code, and pattern list here in my GitHub Repository.