Configure Microsoft 365 DKIM with PowerShell
Let’s see how to configure the DKIM record in your DNS with PowerShell.
First, you need to Connect to Exchange Online PowerShell.
Connect-ExchangeOnline -UserPrincipalName msadmin@m365info.comCopy
1. Get DKIM CNAME selectors
Another way to get your DKIM keys is with PowerShell.
The PowerShell syntax looks as follows.
Get-DkimSigningConfig <domain name> | FL *CNAMECopy
In our example, we want the DKIM CNAME for the domain m365info.com.
Get-DkimSigningConfig "m365info.com" | FL *CNAMECopy
The output shows both DKIM CNAME selectors.
PS C:\> Get-DkimSigningConfig "m365info.com" | FL *CNAME

Selector1CNAME : selector1-m365info-com._domainkey.ms365info.onmicrosoft.com
Selector2CNAME : selector2-m365info-com._domainkey.ms365info.onmicrosoft.com
Copy
2. Add DKIM CNAME selectors to DNS server
You must copy the above selectors and add the two CNAME records to your public DNS server.
This step is the same as explained previously for Microsoft 365. Add both hostnames and selectors to your DNS hosting provider.
3. Enable DKIM for Microsoft 365 domain
To enable DKIM for the domain, you need to run the Set-DkimSigningConfig cmdlet.
Use the below PowerShell syntax to enable DKIM.
Set-DkimSigningConfig -Identity <domain> -Enabled $trueCopy
In our example, we use the same domain, m365info.com.
Set-DkimSigningConfig -Identity "m365info.com" -Enabled $trueCopy
DKIM is enabled successfully for your Microsoft 365 domain.
Note: It’s recommended that you Rotate DKIM keys in Microsoft 365 every 6 months for security purposes.
Verify DKIM record
You can check if the DKIM record is correctly set up in the DNS and does not include any errors. We will show you different methods to verify your DKIM. The MxToolBox or Dmarcian tests only show if you published the DKIM CNAMEs correctly into your DNS. It will not test if you have enabled the DKIM keys in Microsoft 365 Defender or with PowerShell. Therefore you should also send a test mail with Gmail, DKIMValidator, or CheckTLS to test if the message header includes DKIM authentication.
Check DKIM CNAME record with MxToolbox
Check if you configured DKIM CNAME records for your Microsoft 365 domain correctly. You can check both DKIM selectors in MxToolBox.
- Fill in the Domain Name
- Type selector1
- Click DKIM Lookup
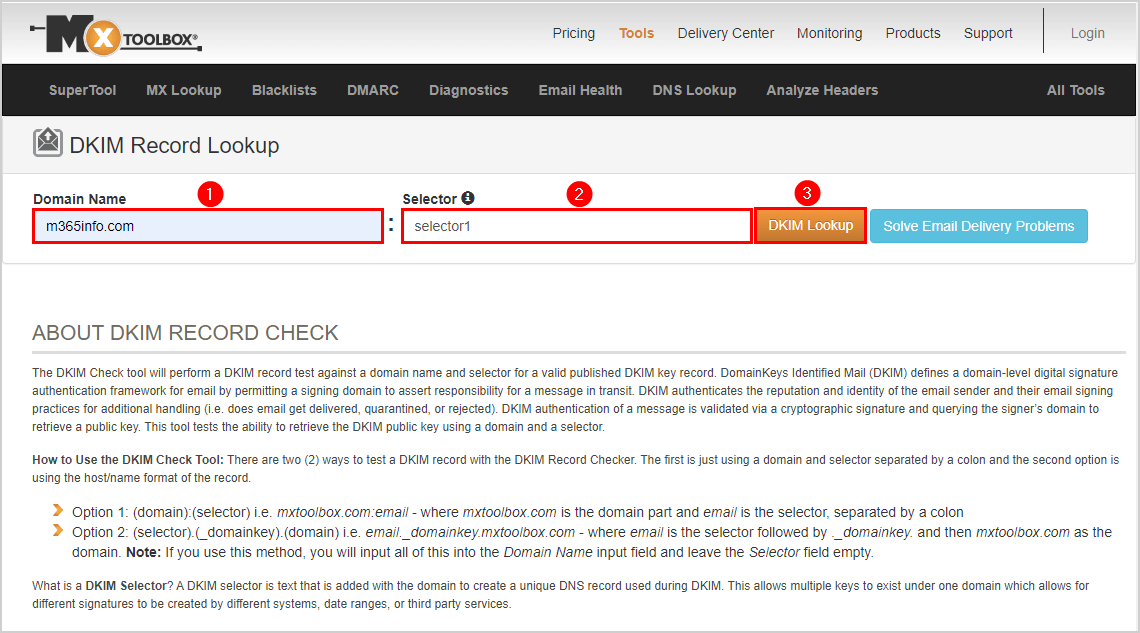
The DKIM selector1 is published correctly, as you can see in the below picture.

Check DKIM selector2 in MxToolBox.
- Change the name to selector2
- Click on DKIM Lookup
It shows that DKIM selector2 is valid.
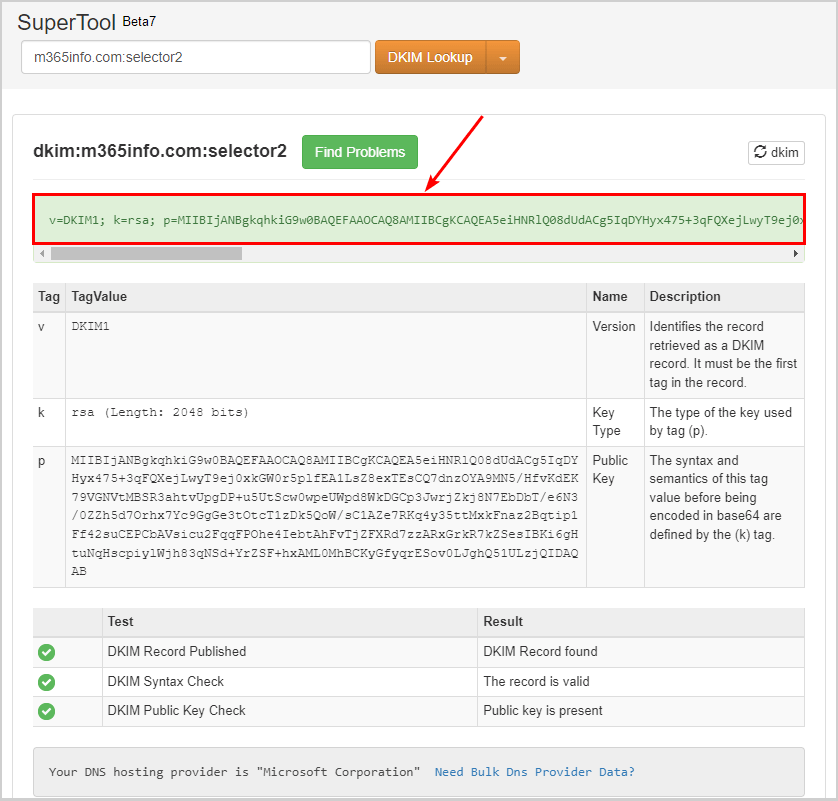
You did successfully configure the DKIM record for Microsoft 365 domain!
Sometimes the DKIM selector2 can’t be found, even though you published it correctly in your DNS. Let’s take a look at this in the next step.
No DKIM Record found
While checking the DKIM records for selector2, the result shows No DKIM Record found.
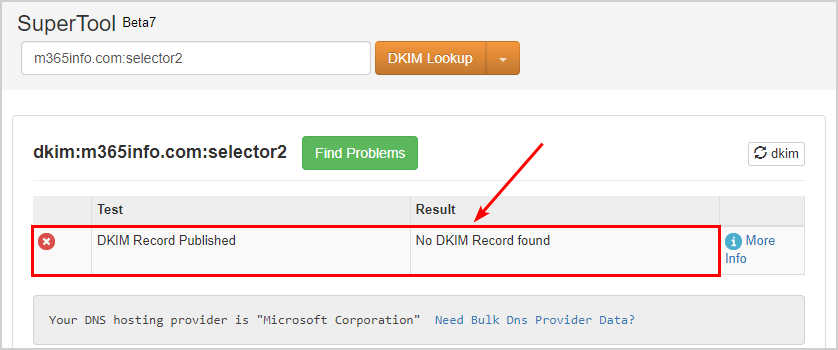
If you also run into this problem, it doesn’t mean your selector2 is wrong. The solution for No DKIM Record found for selector2 is to rotate the DKIM keys.
Rotate DKIM keys by following these steps:
- Go to Microsoft 365 Defender
- Expand Email & collaboration
- Click Policies & Rules > Threat policies
- Click Email authentication settings
- Click DKIM tab
- Click the domain m365info.com
- Click Rotate DKIM keys
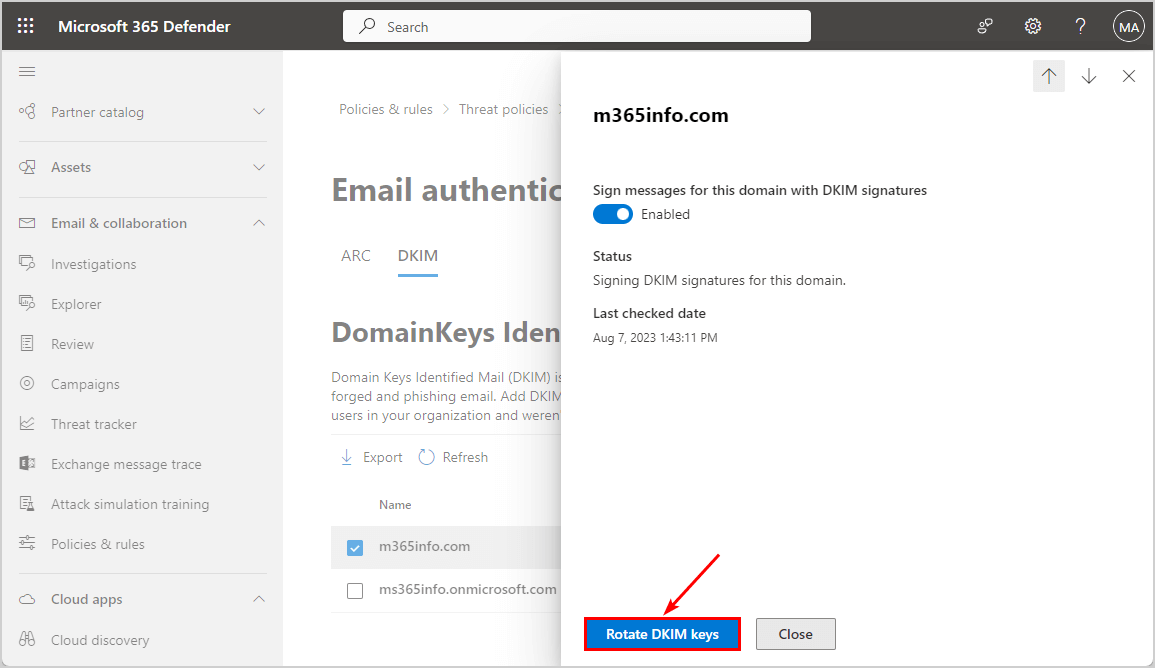
Note: Wait a few minutes and check DKIM selector2 in MxToolBox again. Now the results will show the DKIM Record found.